When working with piezos, soldering is a skill that must be mastered. So what is soldering? Soldering is the the process of fusing different types of metals together by melting solder using a hot iron. This process creates a permanent connection between the different components.
In this post, I'll give you an overview of how to safely solder onto piezos with silver electrodes and the more difficult nickel electrodes. I'll take you through the process for both silver and nickel step-by-step, and if you'd like to follow along visually, you can watch my video where I demonstrate how to solder a good joint onto both silver electrodes and nickel electrodes.
- How to Solder onto Piezo Transducers Video Tutorial
- What Materials You Need to Solder onto Piezo Transducers
- Safety Considerations for Soldering
- How to Make a Solder Joint
- Conclusion
How to Solder onto Piezo Transducers Video Tutorial
This post is based on a series we do called Tip Tuesday where we explore piezo applications and tips to help you better use and understand piezoelectric materials. Check out our video tutorials page for more. And if you have an idea for a tip, please don't hesitate to leave a comment or contact us directly.

What Materials You Need to Solder onto Piezo Transducers
Piezos
The first thing you need to do to make a good solder joint to a piezo transducer is pick a piezo. I'm choosing between two: one is the easy kind that has a silver electrode. The other is the more difficult kind that that has a nickel electrode and is typical of the type sold by Piezo.com. The nickel electrode is only 1000 angstroms thick (an angstrom being 10 to the minus 10 meters) and this has given some people trouble.
Flux
The next thing you'll need is some paraphernalia that's very useful for making good joints. Aside from the piezo, the next most important thing is to have some flux. Flux is available in many different places. If you're going to do a lot of this, we have two kits available that have flux, some solder, and a few sample pieces of piezo so you don't have to practice on any good parts you bought.


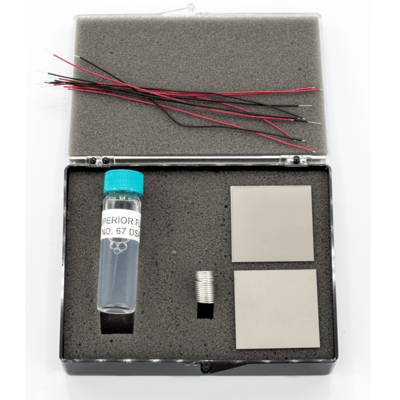 Our KIT-005 Solder & Flux Kit for Silver Electrode
Other materials you'll need:
- Small plastic cup - A small plastic thimble cup is needed to put a few drops of flux in. Remember that you only need a small amount.
- Toothpicks - You only need to apply a very small amount of flux by direct contact. Toothpicks are the perfect size to help you do this.
- Water - You'll need some water to wash off the flux of the solder joint immediately after you make it.
- Solder - Of course, you're going to need some solder. You should use small diameter solder (tiny solder, don't use the big fat stuff!). We also recommend that you use the RoHS (stands for Reduction of Hazardous Substances, normally spoken ROHS-HAS) compliance solder that has no lead. There's nothing wrong with any of the joints and it works just as well as the old tin lead solder does. If your prototype ends up working, then it's going to go into production and you're going to have to figure out how to use the stuff anyway so just get it and use it. Better sooner than later, engineers!
- Flat working surface - It would also be good to have a nice flat working surface, like a small, handy stainless steel plate and a small piece of blue tape for holding things together.
- Soldering iron - If you watched the video that's at the top of this post, you'll have noticed that I had a very nice digital soldering iron with a kind of probe on it, which is about a 10 watt probe. That's really all you need to make a good joint. Using a big, think solder iron will ruin the joint. It's also unnecessary to have a digital soldering iron, but it helps to know what the temperature is if you're trying to follow directions. In any case, even if you don't have a digital one you will need to be able to control the temperature of the iron somehow or other, so take that into consideration.
-
Wire - Now, you can't just solder any old kind of wire to a piezo. If it's too thick, it will be stiff. When you pick it up afterwards or stress it in any way, the wire has a lot of leverage on that tiny joint you've made and it will break the joint, you'll lose your contact and you'll have to do it all over again.
The wire I used in the video is about a 32 gauge wire and that's about right for most piezo projects. In special cases, you might need something thicker, but this is a very good option and it's very flexible.
-
Wire stripper - You will also need a tool that can do some stripping. It is possible to do this with a razor blade, but it's a lot more tedious. With the wire stripped, you'll just take off a tiny amount of the insulation. The reason for that is when you have a nice, long piece of bare wire that's multi-stranded, the melted solder wicks back up into the twisted wire where it solidifies and makes a stiff rod and you have a leverage problem all over again.

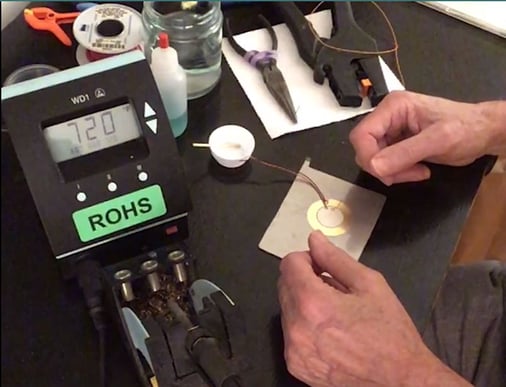
To give you an idea about what my setup looks like, I've included the image below:
Safety Considerations for Soldering
PLEASE NOTE:
It is good practice to do your soldering in a ventilated area. In still air, the various volatiles that are created during soldering rise straight up into your breathing zone. The volatiles contain evaporated flux which is slightly acidic, cooked resin components, and even lead and tin if you don’t use ROHS "no lead" solder. Some laboratories will have a portable solder fume hood available which will divert the updraft away from the work zone. That’s the Cadillac solution.
Another common safety practice is to place a small, low velocity fan (such as those found in computer cabinets) on the bench with a horizontal flow directed across the area where the joint is to be made. That’s the Volkswagen solution.
A nice write up by Lawrence Berkeley Laboratory on soldering safety, which is much more general, can be found here.
How to Make a Solder Joint
Silver Electrodes
Now that you've acquired all of your materials, it's time to make a solder joint. I recommend starting the silver electrode as that's the easy one. It's clean, white and is generally easier to solder. In fact, you don't really need any any flux. Usually you can treat this a lot like you would a circuit board.
One technique that works fairly well is taking the soldering iron, getting a little tiny bead about the size of the joint that you want to make on the tip, and you tend the spot where it's going to be. Then you take the wire that you've pre-stripped to a very short amount and you pre-tend the wire. Then you touch the wire to the little blob on the piezo, and that's it. It makes a good joint. It's a lot like a circuit board where you're depending on the flux that's in the solder.
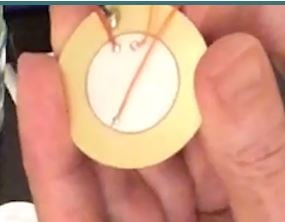 Example of a good joint on a silver electrode
Nickel Electrodes
If you're working with a nickel electrode, it has to be treated entirely differently. If you were to do the same procedure as a silver electrode, it would simply not stick.
The nickel piezo I use in the video is only 1000 angstroms thick and is very lightweight, so it definitely needs to be held in place with tape so it doesn't slide. Even a slight breath will cause it to move.
To begin, take one of your toothpicks and wet the tip. Then, put a small dot of flux right where you want the joint to be. Now, take your wire and strip a little bit off the tip, taking care not to leave very much wire exposed. Next, dip the wire into the flux. Now you've got the flux dot where you want it to go, you've got flux in the strands of the wire, and you have a soldering iron. Put a bead on the soldering iron that is about the same size as you want the joint. Then, lay the wire right on top of the piezo where you want it to be. Take that solder blob, the wet solder blob, and push it down on the both of them. When you hear a little hissing sound, it's done, don't leave it on any longer than that. Then, take a look at your work and then immediately put it in the water.
Now, if you're in the lab, you don't use a cup of water. You can use a cup if it's on the bench, but if you're near a sink you could put a vessel in it and put your multiple pieces in there and let water dribble into it for about 15 minutes to clean them.
The purpose of the water is to stop the action of the flux. It is a mild organic acid, its water soluble and it's very safe, but it's not safe for electrodes. If you leave it on the electrode, they'll eat it away. So, always, always, wash your joints as soon as possible.
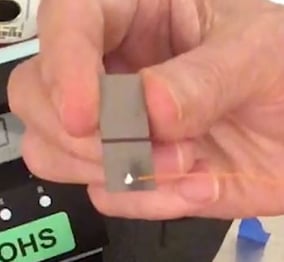 Example of a good joint on a nickel electrode
Conclusion
So there you have it! Now you can make joints just like that right in your own laboratory. For more, don't forget to subscribe to our blog and also check out our video tutorial page for more piezo tips. And, if you have any questions please get in touch with us at Piezo.com.
Related Posts:
